Transferring a WordPress website from one account/server to another can be a daunting task, but with the right guidance, it becomes a manageable process. In this article, we will walk you through the manual transfer of a WordPress website, including both files and the MySQL database, on a cPanel server. This method is useful when you need to migrate your site from an old hosting provider or server, but also when transferring your site from one account to another.
If you only need to transfer a WordPress site from a domain, sub-domain or directory under the same cPanel account, then it's much easier to use the clone feature in cPanel's WordPress Management (formerly WP Toolkit). We have this covered here: How to clone a WordPress website using WordPress Management from cPanel
Step 1: Check Free Space and Generate Separate Backup
- Verify Disk Space: For the transfer, at least the same amount of disk space currently used by your WordPress site will be necessary.
-
Backup Your Website: Optionally, you can create a separate backup of your WordPress website, in addition to the copies that we'll generate next. You can use cPanel's WordPress Management or Softaculous for this purpose. For cPanel's WordPress Management, we have the following guide: How to Back Up and Restore a WordPress Site with cPanel's WordPress Management
Step 2: Archive The WordPress Directory
We can proceed generating a ZIP archive of the WordPress directory, which we'll transfer over to the new account/server.
-
Login to cPanel: Begin by logging in to your cPanel account using your credentials [Accessing your hosting control panel (cPanel)].
-
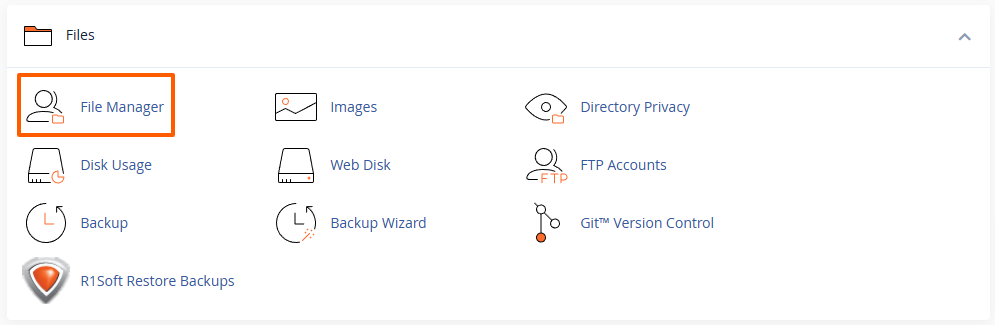
Locate the File Manager: In the cPanel dashboard, navigate to the "Files" section and look for the "File Manager" icon:
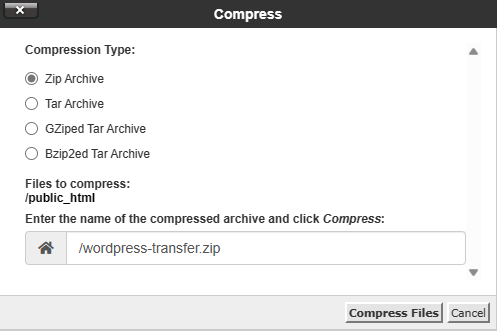
- Select Directory: In the File Manager, select the document root directory of your domain (e.g. the
public_htmldirectory) and click on the "Compress" button:
- Select "Zip Archive", enter a name of your preference, and click on the "Compress Files" button:
- Wait for the archive to complete packing up the files, then look for it in the same directory and click on the "Download" button:

We can proceed transferring the files to the destination account next.
Step 3: Upload Files to the Destination Account
- Log in to the destination cPanel account.
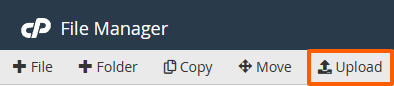
- Open the File Manager, as already described above.
- Upload the ZIP file containing your WordPress files to the destination account/server:
- Select the uploaded ZIP file and click on the "Extract" button:

- Extract the contents of the ZIP file in the home directory by leaving the input field blank:
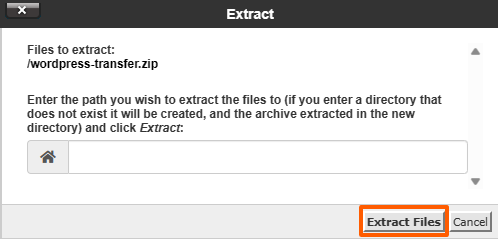
Please note that if you need to place the site in a different directory, you will need to set the location accordingly. You may also need to move the content from the "public_html" directory (that is unpacked from the archive) to the desired location.
Step 4: Backing Up and Transferring the MySQL Database
The WordPress MySQL database will need to be exported from the old account/server and imported to the new account/server, after which the database tables and WordPress configuration file will need to be updated.
-
Export the MySQL Database:
- In cPanel, go to phpMyAdmin on the source account/server:
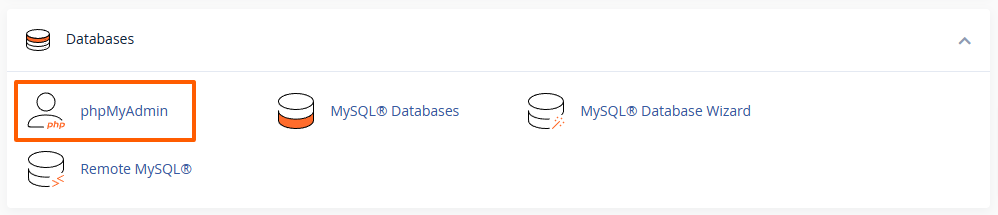
- In phpMyAdmin, in the left sidebar, click on the database associated with your WordPress installation.
- If there are multiple databases and you don't know which one is related to the WordPress site that you transfer, you can find the database name in the
wp-config.phpfile under the optionDB_NAME. This information can also be found under the installation details in cPanel's WordPress Management or Softaculous, if these are available.
- If there are multiple databases and you don't know which one is related to the WordPress site that you transfer, you can find the database name in the
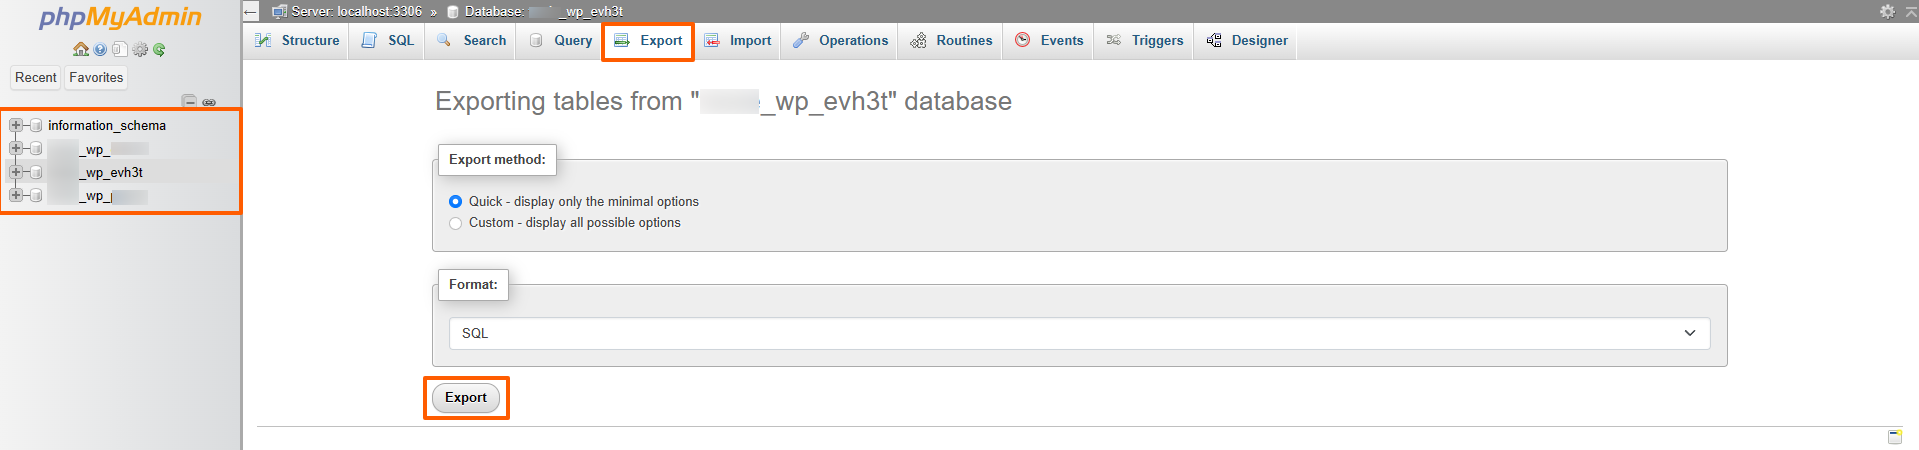
- Click on the "Export" tab.
- Choose the export method (Quick or Custom) and click on the "Export" button to download the SQL file. Depending on the size of the database, this can take from a few seconds to several minutes.
- In cPanel, go to phpMyAdmin on the source account/server:
-
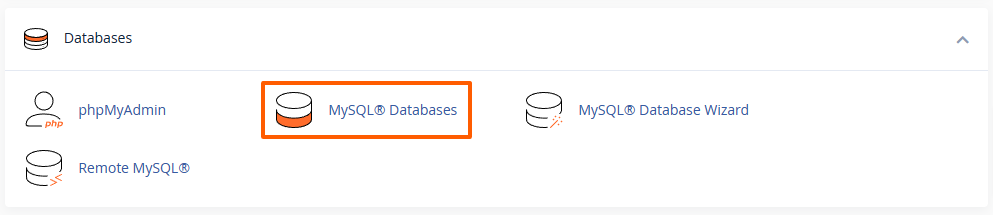
Create a New Database on the Destination account/server:
- In cPanel, go to MySQL Databases:
- Create a new database:

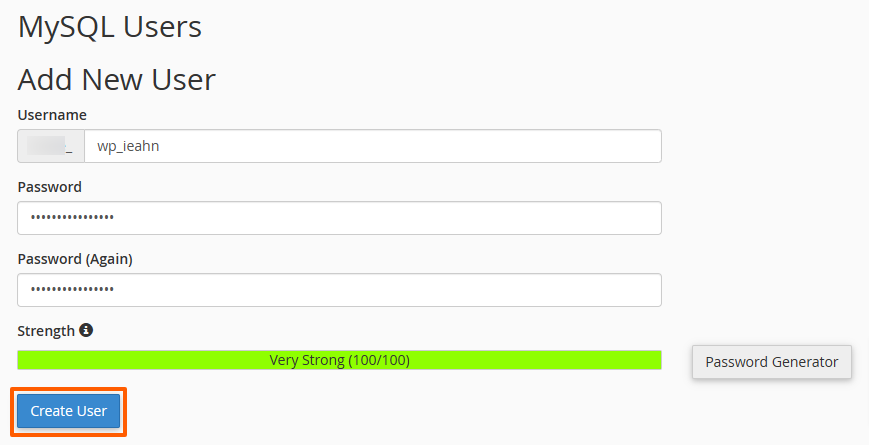
- Create a new database user:
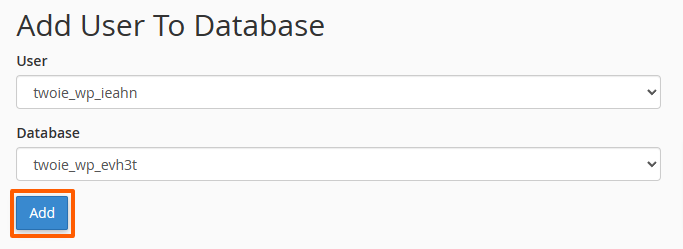
- Add the user to the database:
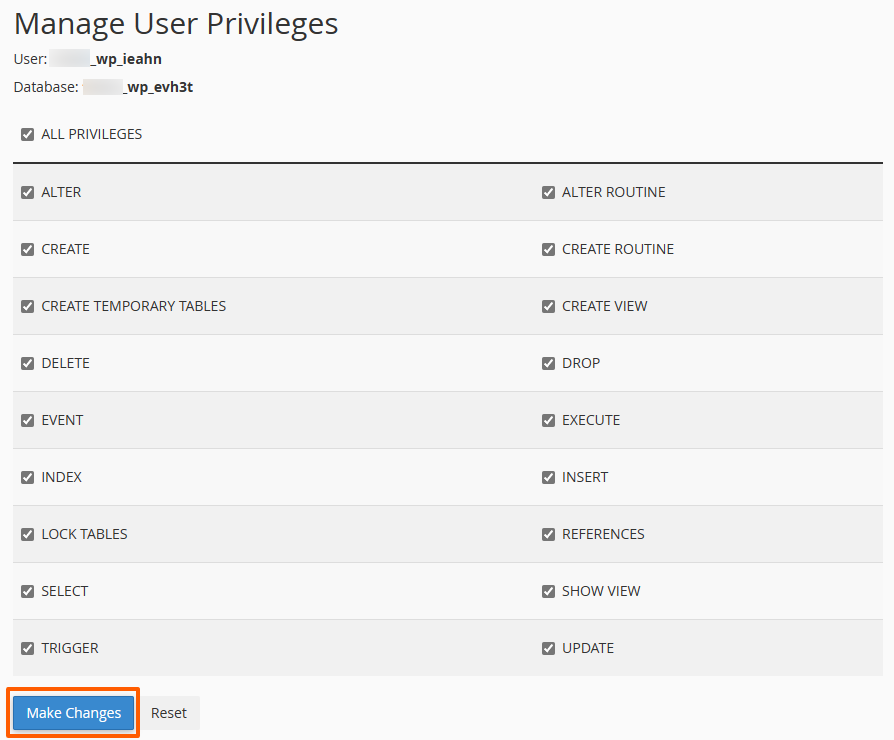
- Assign full privileges:
- In cPanel, go to MySQL Databases:
-
Import the MySQL Database:
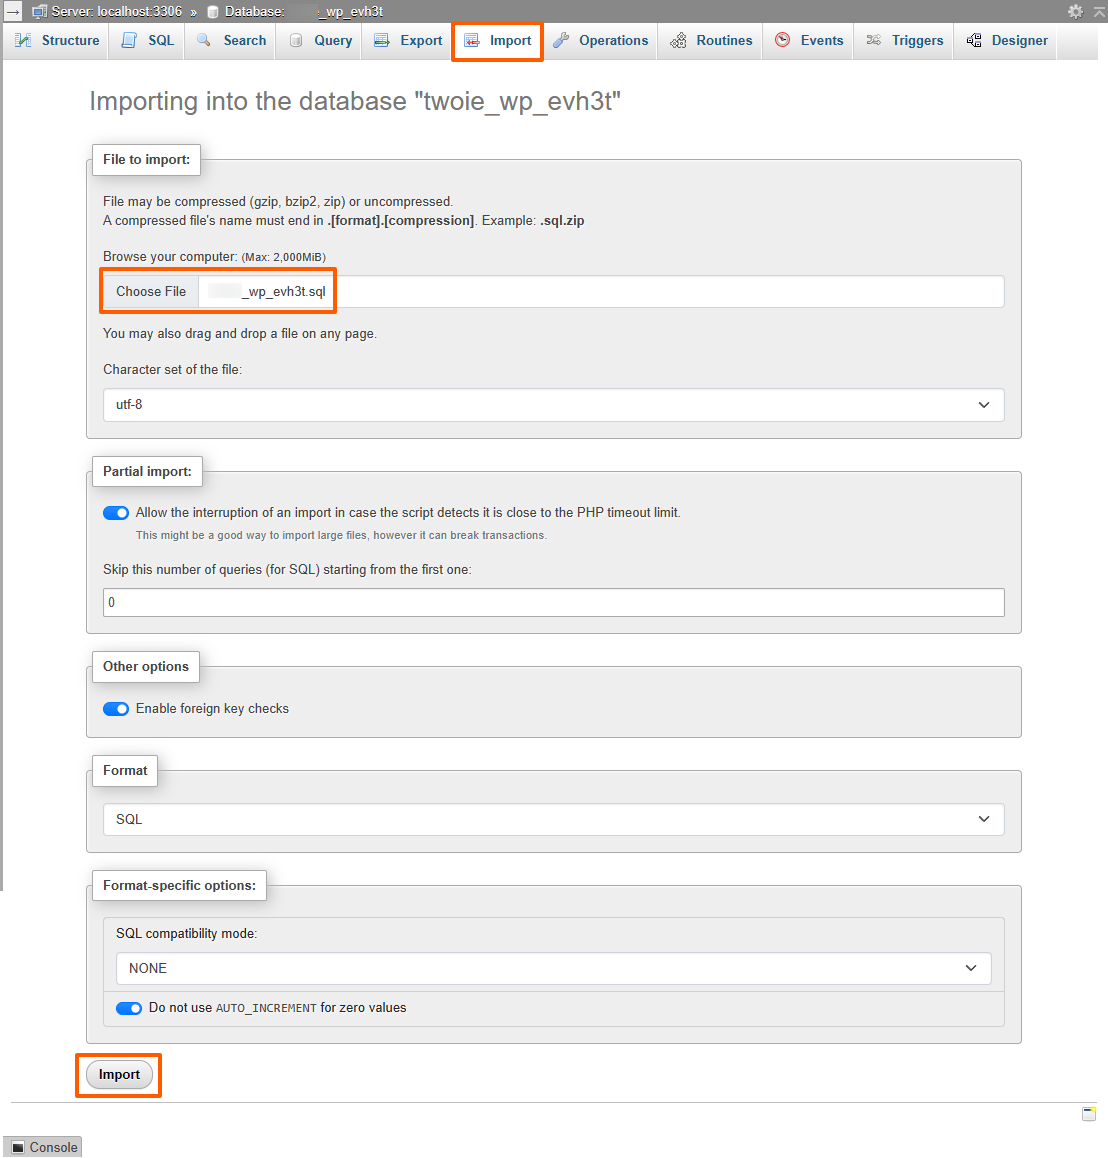
- In cPanel, go to phpMyAdmin on the destination account/server:
- Select the newly created database.
- Click on the "Import" tab.
- Choose the SQL file you downloaded earlier and click on the "Import" button to import the data:
Depending on the size of the database and your upload speed, the import can take a few seconds to several minutes to complete. Please be patient and wait for the import to finish.
- In cPanel, go to phpMyAdmin on the destination account/server:
Step 5: Update WordPress Configuration
-
Update wp-config.php:
- In the File Manager, locate and edit the
wp-config.phpfile on the destination account/server: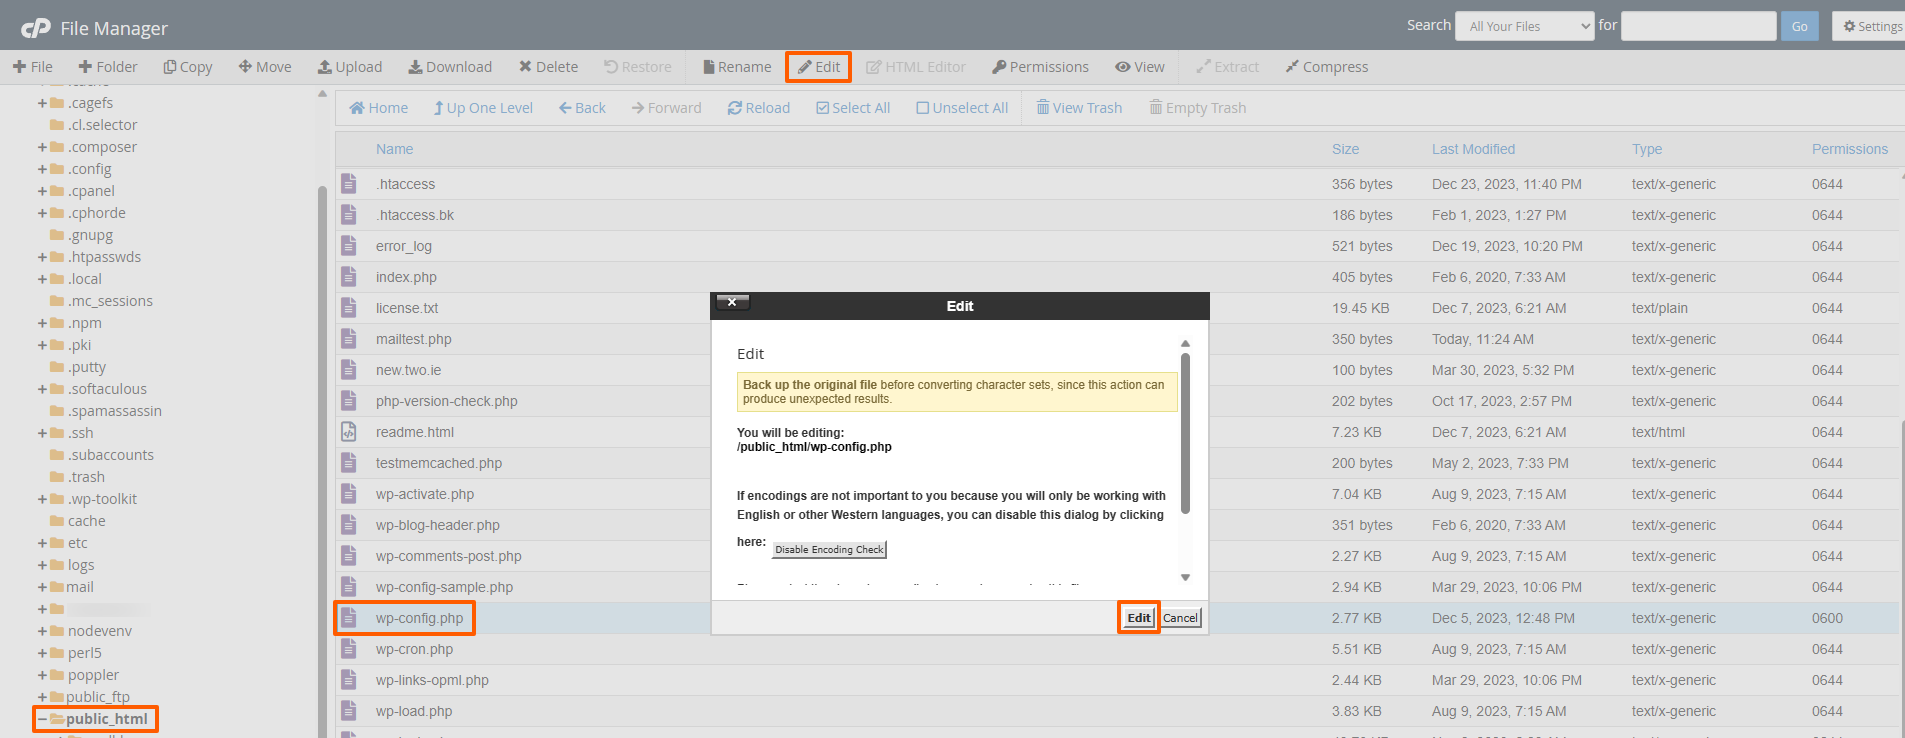
- Update the database name, username, and password to match the new account/server (as entered at Step 5):

- In the File Manager, locate and edit the
-
Search and Replace URLs and Absolute Path:
- These steps are only necessary when migrating a WordPress site to an account with a different username, to a different domain name and/or to a different server environment.
- To avoid broken links, search and replace the old domain name with the new one in the database.
- Important: You must use tools like WP Migrate DB or Search & Replace for WordPress Databases. Editing the database manually will break the serialisation and all respective data can disappear completely and irrecoverably.
- To find out how you can use the second tool, check out their article on WordPress migrations or visit the WP Tuts+ article that mentions this script.
- When migrating from one account to another with different usernames, or from a non-cPanel server to a cPanel server (or vice-versa), the absolute path will also need to be adjusted in the database and possibly in the
wp-config.phpfile or other plugin/theme configuration files. This can differ from site to site, depending on its configuration and set of plugins/themes.
Final Steps
-
Update Nameservers or DNS Records:
- If you are migrating the site and domain from a different hosting provider, you will need to update the nameservers or DNS records to point to our server. You can find our nameservers in the hosting account activation email or here: Maxer Host DNS nameservers
- Please allow up to 24 hours for any nameserver or DNS changes to take effect.
- For migrations within our network, the domain name usually doesn't need to have its nameservers updated; unless you are migrating from a shared hosting environment to a dedicated/virtual hosting environment.
- If you are migrating the site and domain from a different hosting provider, you will need to update the nameservers or DNS records to point to our server. You can find our nameservers in the hosting account activation email or here: Maxer Host DNS nameservers
-
Test Your Website:
- Visit your website on the new server to ensure everything is working correctly.
- Check for broken links, missing images or static elements, and other issues.
-
Keep a Backup:
- Some issues can happen to get noticed only after a few days or weeks. Before removing the source site/account, make sure to download a full backup and keep it for a while, as a precaution.
Conclusion
Manually transferring a WordPress website might seem intricate, but by following these step-by-step instructions, you can successfully migrate your site to a new account or hosting environment. Always remember to perform backups before making any changes and thoroughly test your website after the transfer to ensure a smooth transition.
Updated by SP on 27/12/2023


