Backing up your WordPress website is crucial to ensure the safety and security of your data. cPanel's WordPress Management (formerly WP Toolkit) is a powerful tool that simplifies the process of backing up and restoring your WordPress site.In this knowledgebase article, we will guide you through the steps for creating backups and restoring your WordPress site using cPanel's WordPress Management.
Disk Space Requirement
Before generating a new backup, please ensure that you have at least as much available disk space as your site currently uses. You can check your site's disk space usage by using the cPanel Disk Usage analyser.
-
Log in to your cPanel account [Accessing your hosting control panel (cPanel)]
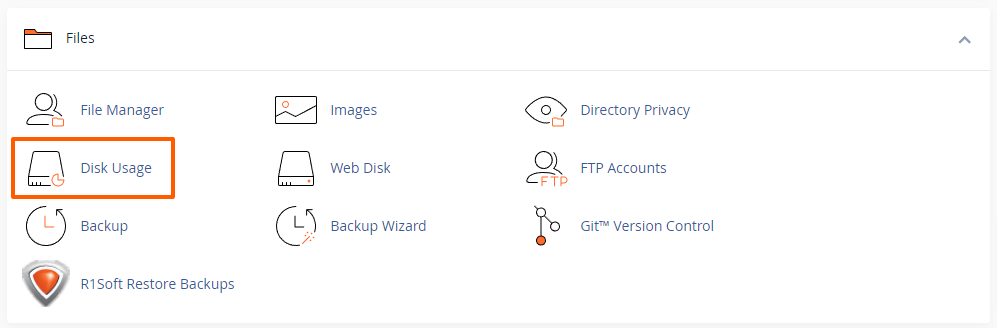
- In the cPanel dashboard, scroll down to the "Files" section.
-
Click on the "Disk Usage" icon:
- Wait for the disk usage to be calculated (this can take several seconds to several minutes), then scroll down to the bottom of the page where you can find a "directory tree" with the contained disk usage of each directory.
- Look for the directory where your WordPress site is installed. Typically, this is the
public_htmldirectory for the main site:
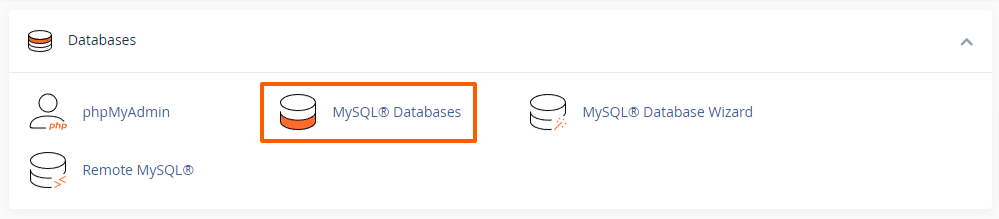
As you can see, in the above example, the files and folders of our WordPress site has a contained disk usage of approximately 133 MB. - To find out how much disk space the WordPress database uses, go back to the cPanel dashboard and scroll down to the "Databases" section, where you can find the "MySQL Databases" button:
- Scroll down to the "Current Databases", where you will find all databases, including the one of your WordPress site and its disk usage:

In our example, the total disk usage of the files/folders and the MySQL database is around 144 MB. Therefore, the minimum amount of free disk space that our account should have available would be approximately 150 MB, although it's highly recommended to keep at least 10% free disk space for scheduled tasks, temporary files and system processes.
You can check your used and available disk space on cPanel's front page in the "Statistics" sidebar on the right: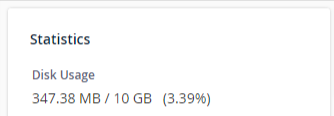
Once you've checked that you have enough disk space available to generate new backups, you can proceed with the following steps. Otherwise, please scroll down to the step "Removing Backups" to delete old backups, or try to delete any other files that you may no longer need.
1. Accessing cPanel's WordPress Management
Before you can start creating backups and restoring your WordPress site, you need to access cPanel's WordPress Management. Follow these steps:
-
Log in to your cPanel account [Accessing your hosting control panel (cPanel)]
- In the cPanel dashboard, scroll down to the "Domains" section.
-
Click on the "WordPress Management" icon to access the WordPress Management interface:

2. Creating a Backup
To create a backup of your WordPress site using cPanel's WordPress Management:
-
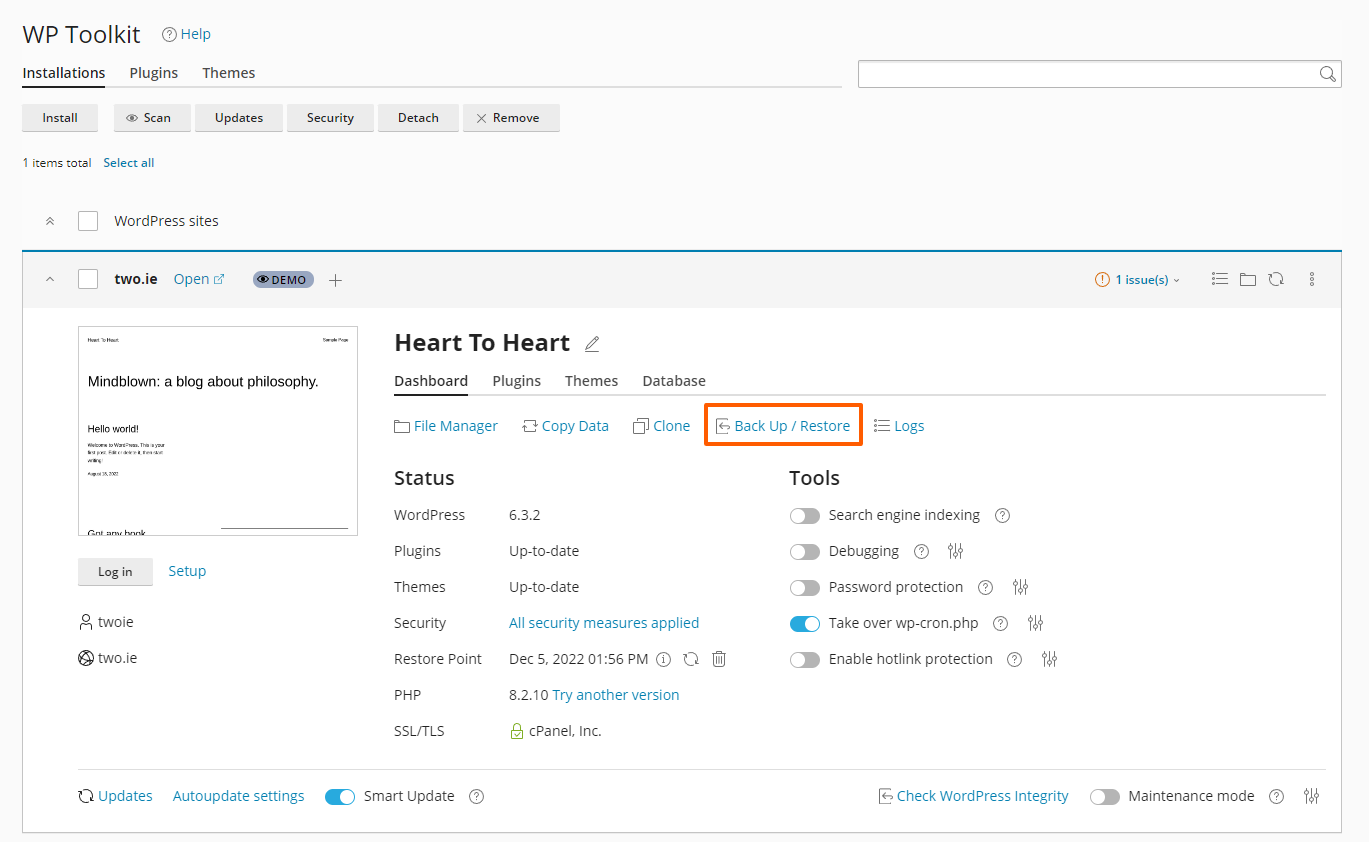
In the WordPress Management interface, you'll see a list of all your WordPress installations. Click on the WordPress site you want to back up to expand the panel of options.
-
In the site overview, go to the "Dashboard" tab, which is normally selected by default.
-
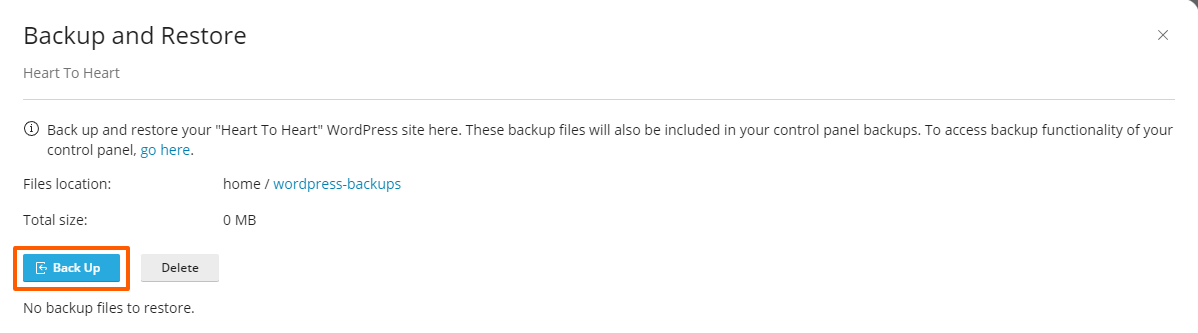
Click on the "Back Up / Restore" button:
- A new panel will open. Click on the "Back Up" button:
-
Wait for the backup to generate. You can monitor the progress in the WordPress Management interface at the bottom of the page:

-
Once the backup is complete, you'll see a notification and the new backup listed:
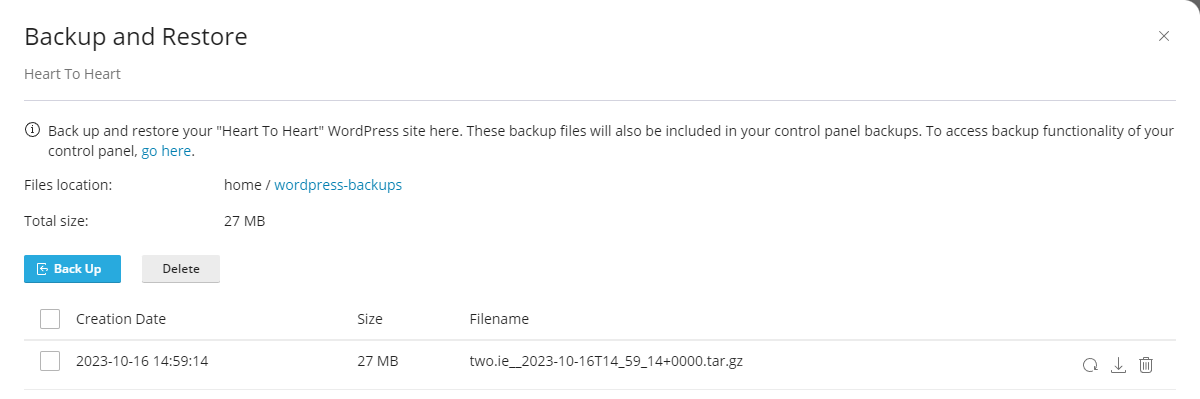
- Next to each backup, you can find buttons to restore, download and delete the backup.
3. Restoring a Backup
Restoring a backup is also straightforward with cPanel's WordPress Management:
-
In the WordPress Management interface, select the WordPress site you want to restore.
-
In the site overview, go to the "Dashboard" tab.
-
Click on the "Back Up / Restore" button:
-
You will see a list of available backups. Click on the "Restore" icon next to the backup that you want to restore:
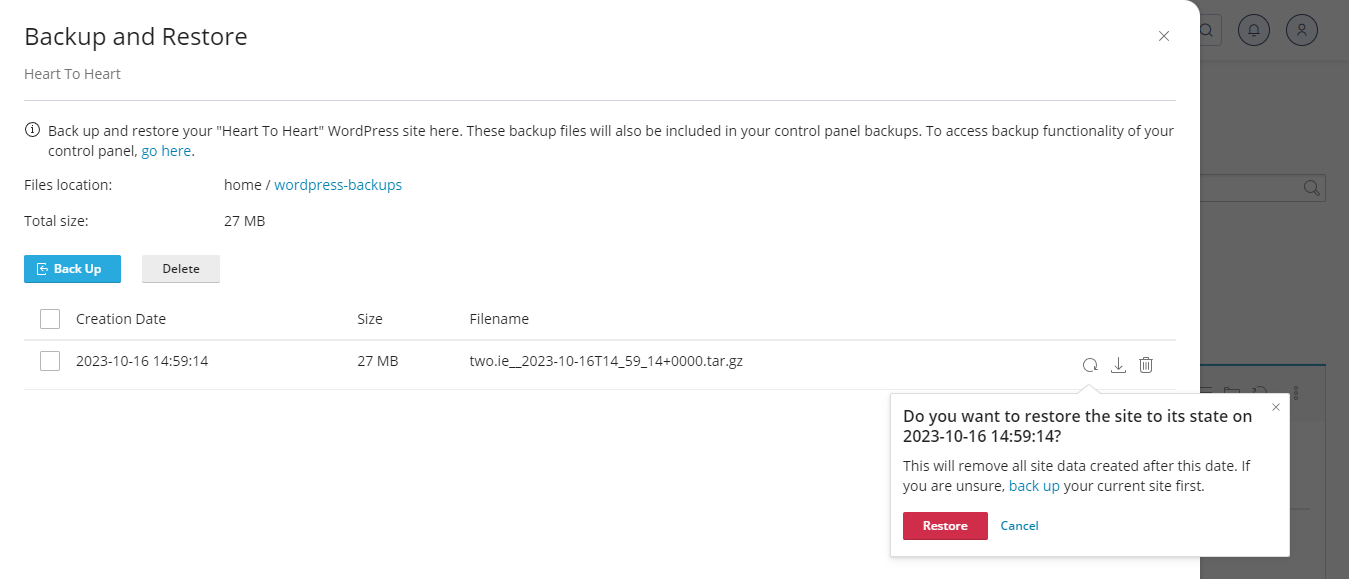
- Confirm the restoration by clicking on the red "Restore" button in the confirmation dialog.
-
The restoration process will begin. Once it's complete, you'll receive a notification. You can monitor the progress in the WordPress Management interface at the bottom of the page:

4. Download Backups
You can download backups to your local storage for extra security:
-
In the WordPress Management interface, select the WordPress site you want to download backups for.
-
In the site overview, go to the "Dashboard" tab.
-
Click on the "Back Up / Restore" button:
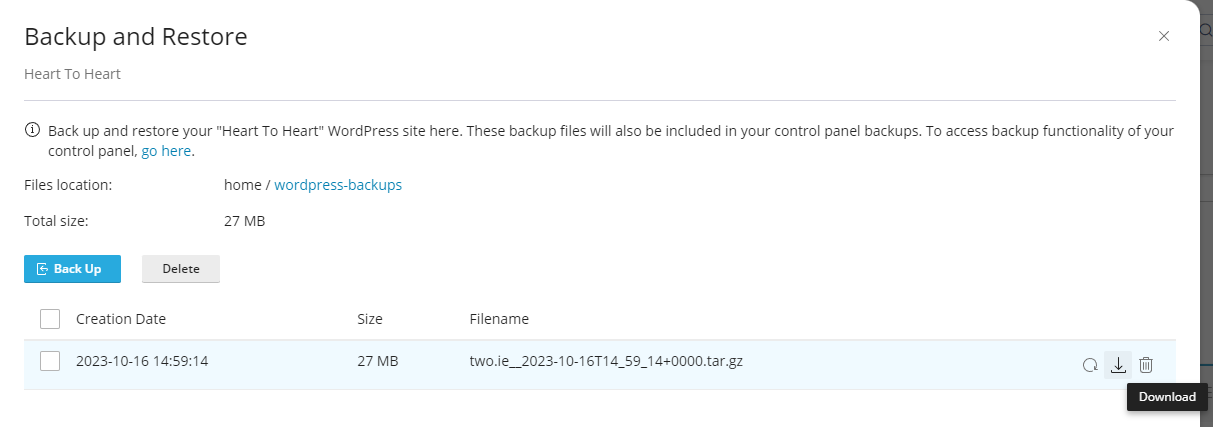
- Locate the backup you want to download and click on the "Download" button:
-
The cPanel File Manager will open in the directory where the WordPress Management backups are saved (the
wordpress-backupsdirectory). - Select again the backup file that you wish to download:

-
Save the backup file to your local computer or storage.
5. Removing Backups
To manage your backups efficiently, you can delete or restore them as needed:
-
In the WordPress Management interface, select the WordPress site you want to manage backups for.
-
In the site overview, go to the "Dasboard" tab.
-
Click on the "Back Up / Restore" button:
- You'll see a list of your backups. From here, you can select specific backups to delete.
- To delete a single backup, click on the "trash can" icon next to the backup that you'd like to delete:
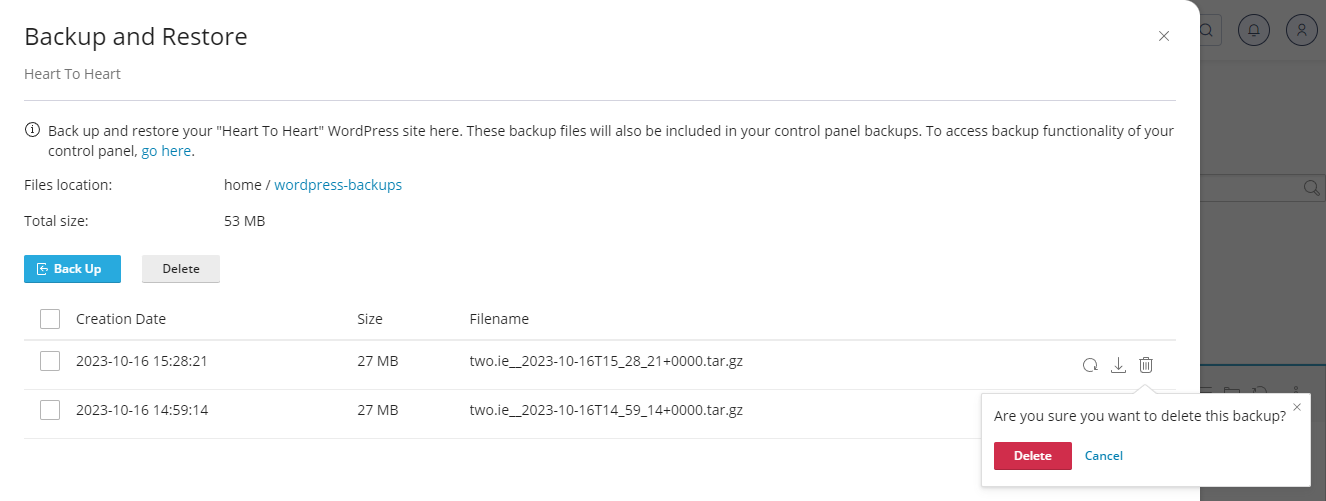
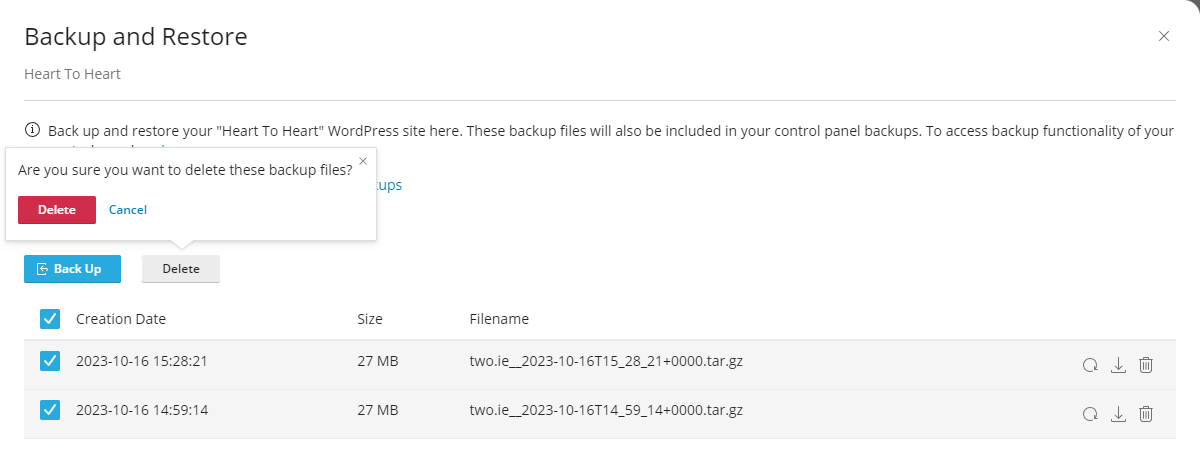
- If you'd like to delete multiple backups at once, tick the check box on the left next to the backups that you'd like to remove, then on the "Delete" button twice (for confirmation):
- To delete a single backup, click on the "trash can" icon next to the backup that you'd like to delete:
If you delete a backup file by mistake, we may still have a copy in our remote R1Soft backups. You can restore them by navigating in cPanel to Files -> R1Soft Restore Backups, where you can find all available recovery points. There you can browse the WordPress Management backups in the wordpress-backups directory and choose to restore only what you need. Alternatively, you can open a ticket with our technical support department and we'll be happy to restore the WordPress Management backup file(s) for you.
6. Scheduled Backups
cPanel's WordPress Management does not currently offer an option for automatic or scheduled backups. Instead, you might consider importing your website to Softaculous WordPress Manager and using its setting for automated backups. There are also WordPress plugins available for automated backups, but be cautious as they may not function optimally in shared hosting environments and could potentially impact your website's performance.
Importantly, all our web hosting plans include our backup service as standard. This means your full hosting account (including all files, databases and emails) are automatically backed up. For disaster recovery purposes, all backups are stored in an off-site location. Generally speaking, we retain 21 daily backups and 2 end-of-month backups. There's more information here: Do You Provide Backups?
We recommend having several methods of backup, in case or other happens to fail. Regularly backing up your WordPress site is crucial to prevent data loss and prepare for unexpected issues. With cPanel's WordPress Management, you can streamline the backup and restoration process, enhancing the safety and security of your website.
Updated by SP on 16/10/2023


