WordPress is one of the most popular content management systems and blogging web apps available, allowing users to create and manage websites easily. On our cPanel hosting services, you can use WordPress Management (formerly WP Toolkit) to install WordPress quickly and easily. In this article, we will go through the steps required to install WordPress using cPanel's WordPress Management.
Step 1: Login to cPanel
The first step is to log in to your cPanel account. You can do this as described in our article here: Accessing your hosting control panel (cPanel)
Once you are logged in, you should be taken to your cPanel dashboard.
Step 2: Navigate to WordPress Management
After logging in to cPanel, you need to navigate to Domains -> WordPress Management.

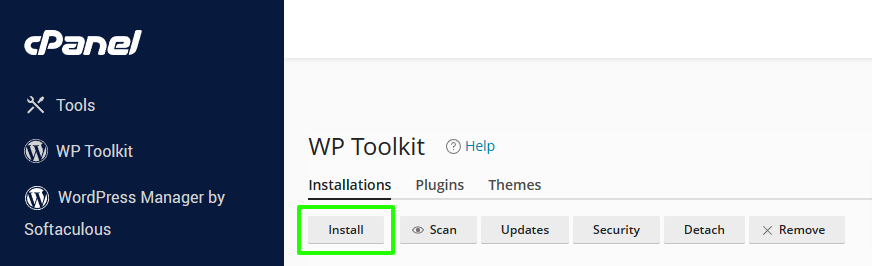
Step 3: Initiate the installation
Click on the Install button under the Installations tab.
Step 4: Enter installation details
In the installation window that appears, you will need to enter the installation details.
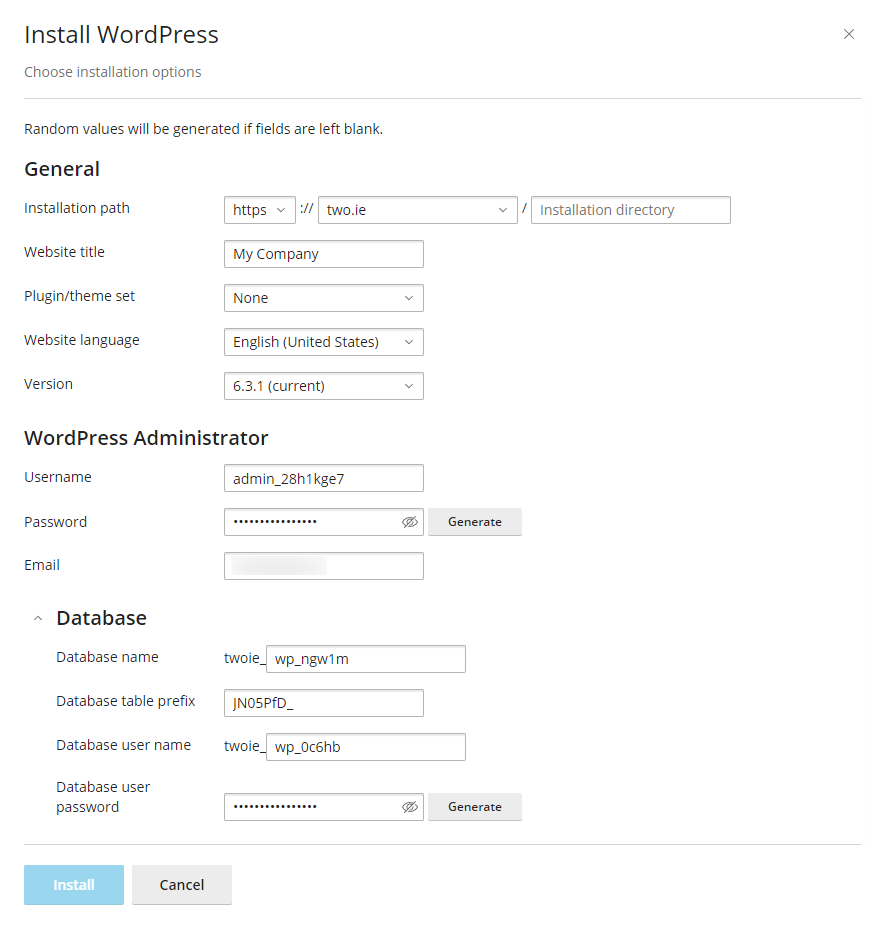
General:
- Installation path: Always select https as the protocol. Select the domain name (or sub-domain) and the folder where you wish to install WordPress. If WordPress should be installed as the main site under the root folder, leave the directory field blank.
- Website title: Enter the title of your site
- Plugin/theme set: Optionally, select a package of plugins and themes to install. You can still install plugins and themes individually after the installation.
- Website language: Select the preferred language. This should be the language of your target audience.
- Version: Select the WordPress version that you'd like to install. The latest version is always recommended.
WordPress Administrator:
- Username: Enter a username to login to WordPress. It's strongly recommended not to use a generic username, such as "admin", "user" or anything that's easy to guess and attack.
- Password: Enter a strong password. Please remember that WordPress sites are a popular target for brute-force attacks, so ideally, you would set a password longer than 18 characters, containing alphanumeric and special characters.
- Email: Enter the email address for the WordPress site and user. This is the email address where you will also receive important notifications related to your site.
Database:
- All fields in this section will be automatically pre-filled and should not be changed, unless you need to.
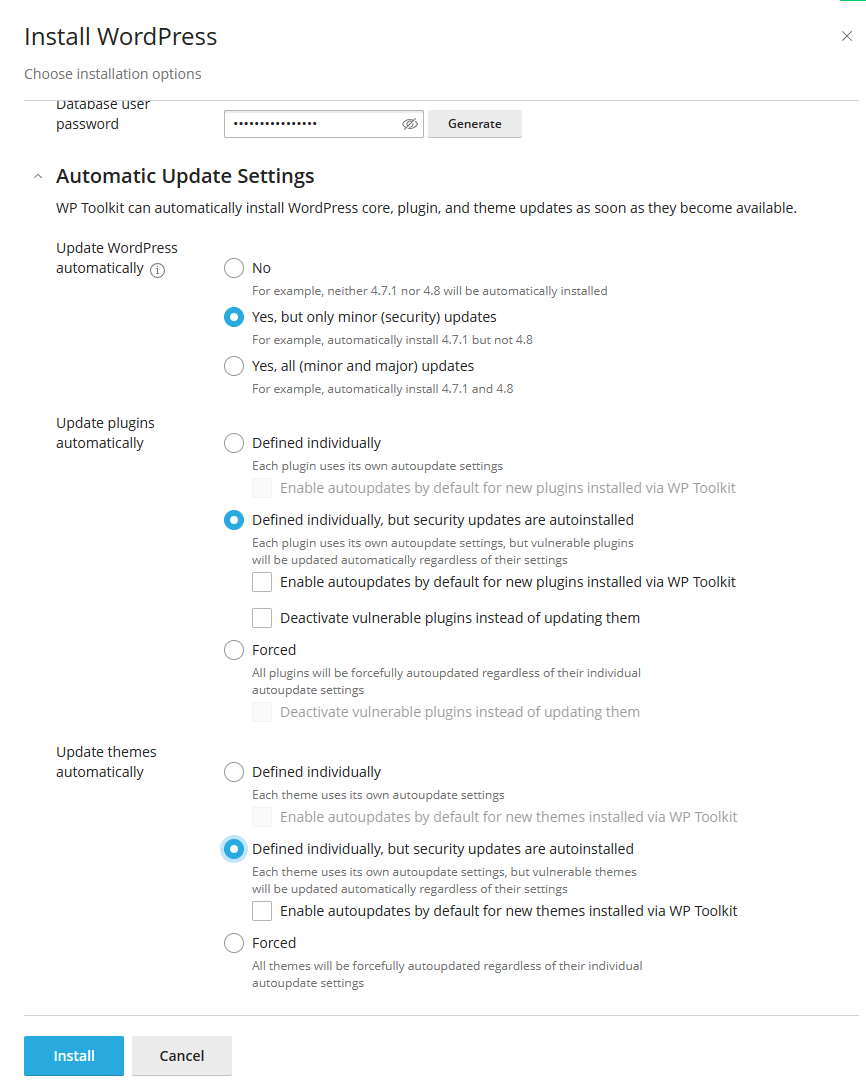
Step 5: Configure the update settings
WordPress Management can automatically install WordPress core, plugin, and theme updates as soon as they become available.
It is strongly recommended to install at least minor and security updates, as WordPress sites are very often targeted by hackers and malicious bots. Regardless of the size and popularity of your site, there are still automatic bots that scan sites across the internet randomly and try to exploit any vulnerabilities that they find. For this reason it is crucial to apply updates on a regular basis. WordPress Management can help you to automate this process.
We have a more detailed guide regarding how you can apply updates automatically and without risking technical issues due to faulty updates here: How to update your WordPress site with WordPress Management and Smart Update
Below are the minimum settings that we recommend (minor and security updates), although it would be even better to apply major updates automatically as well.
Step 6: Click Install
After entering the installation details, click the Install button. WordPress Management will then begin the installation process, which may take a few minutes. Once the installation is complete, you will be able to access your WordPress site by navigating to your domain or the WordPress URL in your web browser.
The WordPress site will appear in WordPress Management under the Installations tab, where you can manage it and perform various actions.
Step 7: Login to WordPress
To access the WordPress dashboard, you will need to log in using the administrator username and password you created during the installation process. The WordPress dashboard can be accessed by appending /wp-admin or /wp-login.php to the site URL (example: https://yourdomain.tld/wp-admin).
Once logged in, you can start customizing your site, adding content, and installing themes and plugins.
Conclusion
Installing WordPress using cPanel's WordPress Management is a quick and easy process. By following the steps outlined above, you can have your WordPress site up and running in just a few minutes. Whether you are creating a personal blog, a business website, or an online store, WordPress is a powerful tool that can help you achieve your goals.
Updated by PA on 29/06/2024


